How to Fix “Failed to connect to Windows service” Error?
The error Failed to connect to Windows service can occur when a computer crashes during the reboot process during Windows Updates. The computer reports an unexpected shutdown during Windows Updates and then begins to display this error message. In many instances, this error comes from the loss of critical Registry settings essential for initializing the Group Policy Client service.

Group policies are configurations sent to a computer’s registry to configure security settings and other operational behaviors. Group policies can be applied from Active Directory (although it’s the client that actually retrieves them) or set up locally through the group policy editor.
1. Use the Registry Editor
If these settings are incorrect or missing due to system errors or malfunctions during updates, it can result in the inability of your system to connect to the Group Policy Client service, thus preventing user logins. By following the outlined registry modifications, you’ll be realigning the necessary configurations, which can help restore normal service operation and resolve the login issues.
- Press the Windows Logo key + R to open a Run dialog, type regedit, and click OK. This will open the Registry Editor.

- In the Registry Editor left pane, navigate to the following path and verify the presence of a folder named gpsvc. This folder is central to service configuration and parameters. Typically, it will be present here:
HKEY_LOCAL_MACHINE > SYSTEM > CurrentControlSet > Services
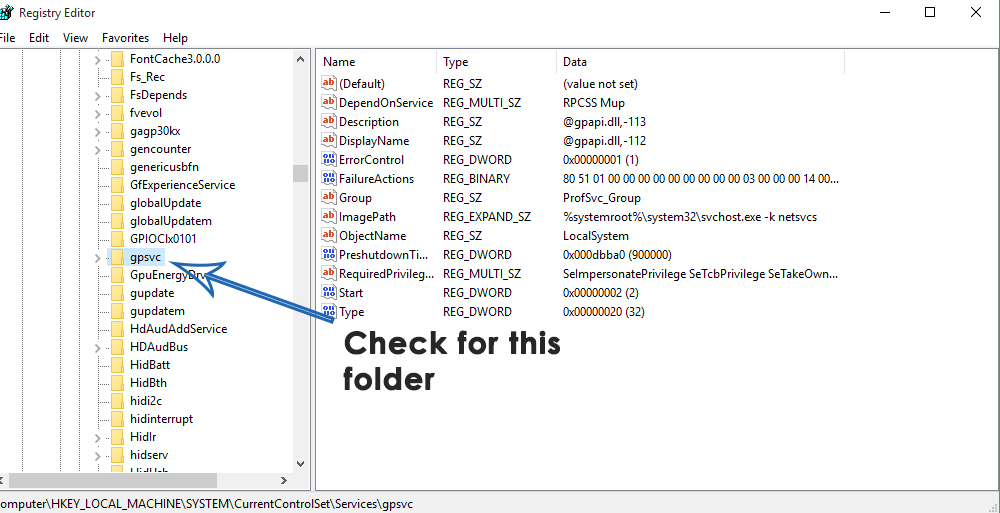
- If gpsvc exists, navigate to the following key within the left pane of the Registry Editor. This path is crucial and sensitive, so be cautious not to change anything else.
HKEY_LOCAL_MACHINE > SOFTWARE > Microsoft > Windows NT > CurrentVersion > SvcHost
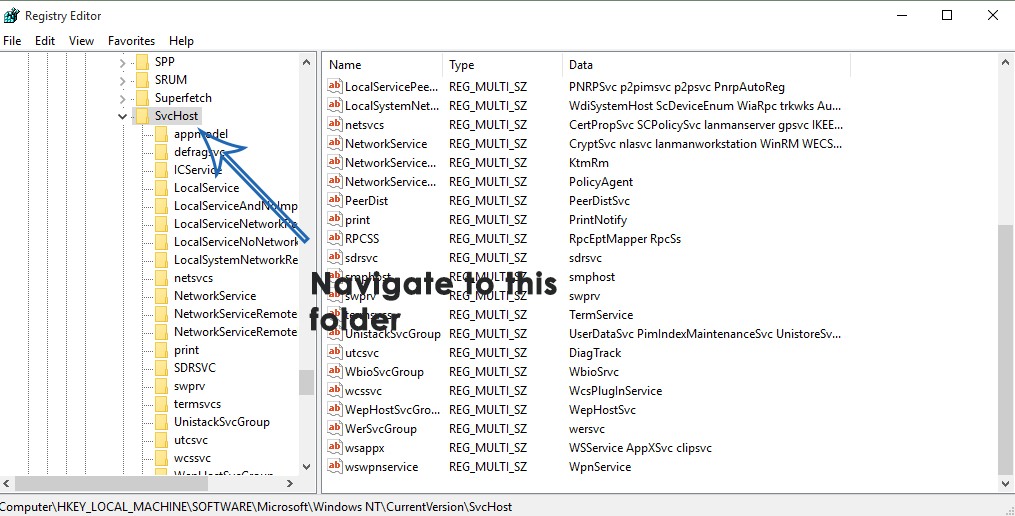
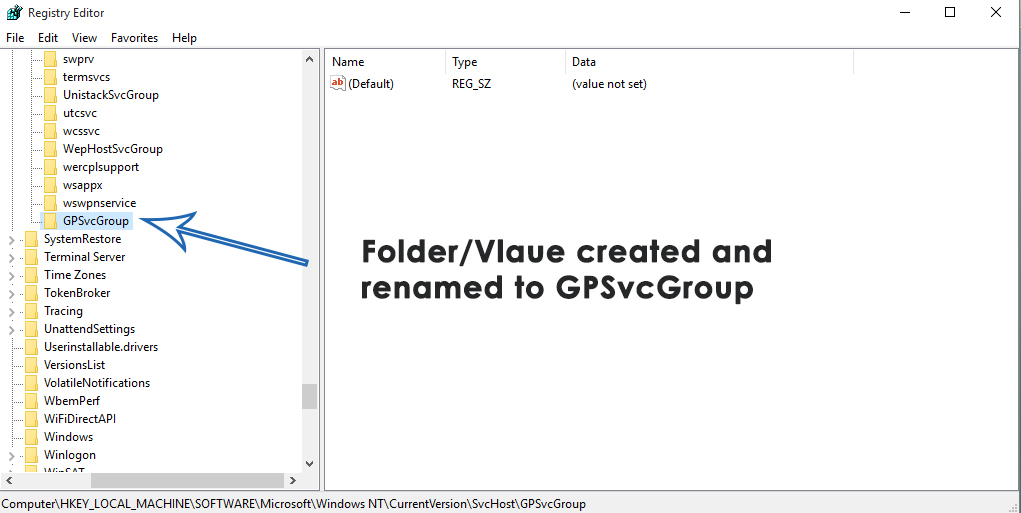
- Within the SvcHost folder, look for keys and values required for this process. Check for the existence of a multi-string value named GPSvcGroup. If it’s not there, you’ll need to create it. Right-click on SvcHost, go to New, and select Multi-String Value.
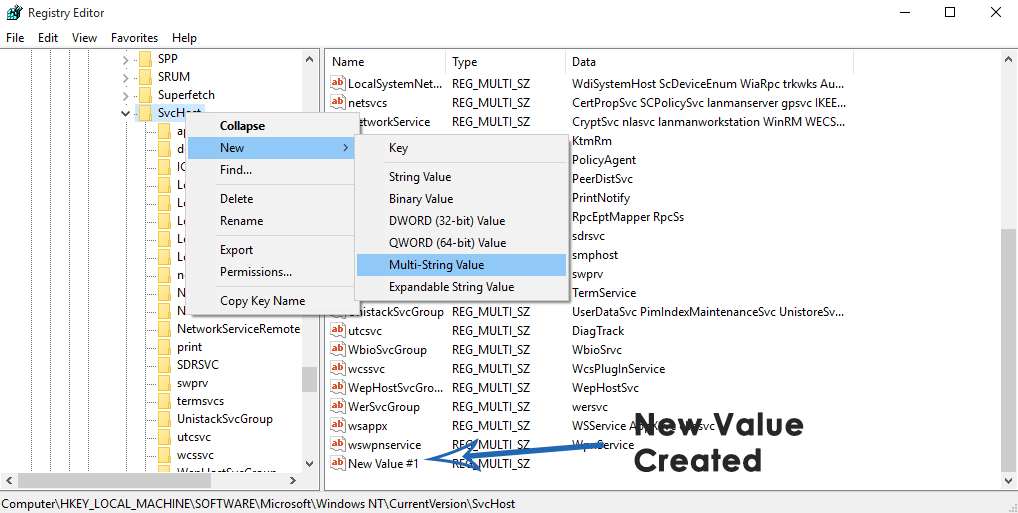
- A new registry value will appear in the right pane. Rename it to GPSvcGroup via right-click and Rename, then typing GPSvcGroup and hitting Enter. Double-click GPSvcGroup to modify it, replace any content in the Value data field with GPSvc, and click OK.
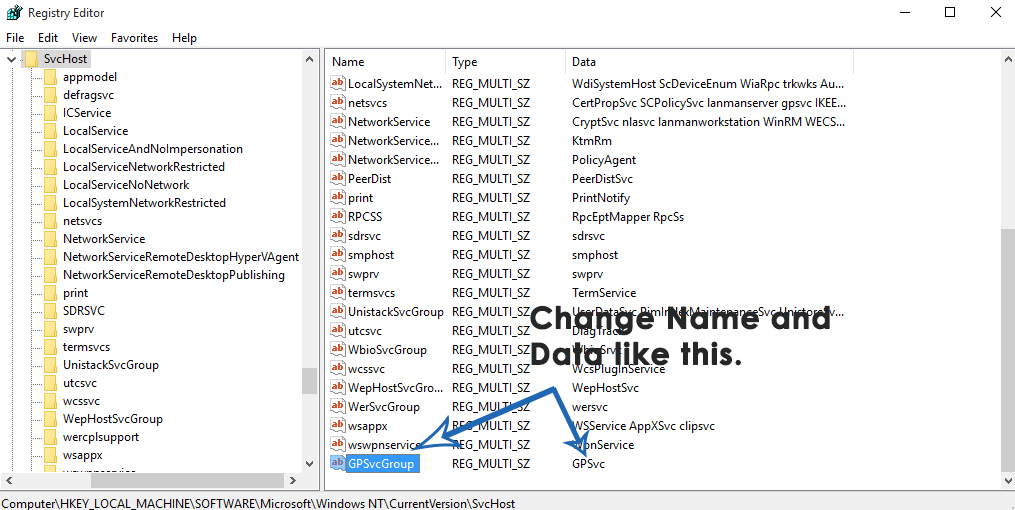
- Next, you may need to create a new key within SvcHost. Right-click on SvcHost, hover over New, and click Key. Rename the new key to GPSvcGroup.
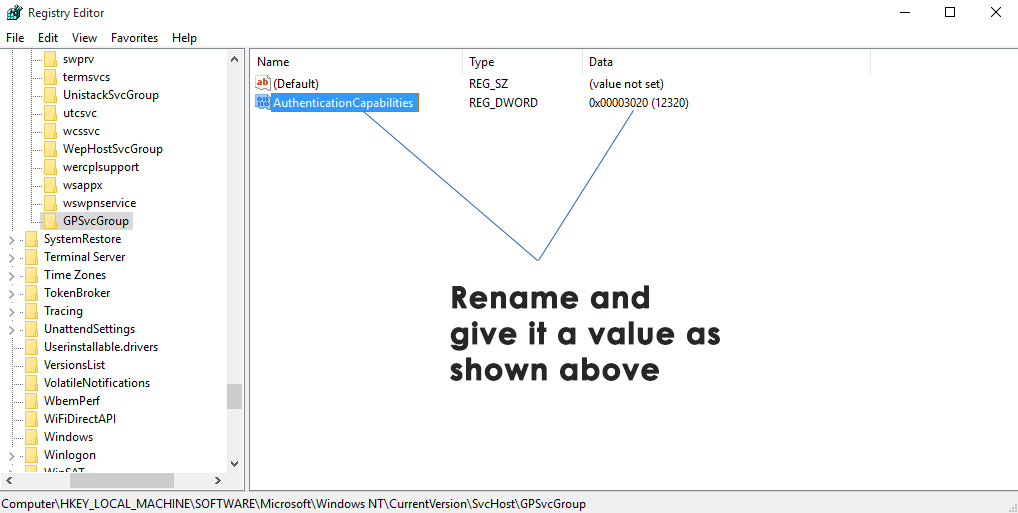
- In GPSvcGroup, create two new DWORD (32-bit) values. Right-click in an empty space, go to New, and select DWORD (32-bit) Value. This step should be repeated for a total of two new values.
- Rename the first value to AuthenticationCapabilities, setting its Value data to 12320 and using Decimal as its base.
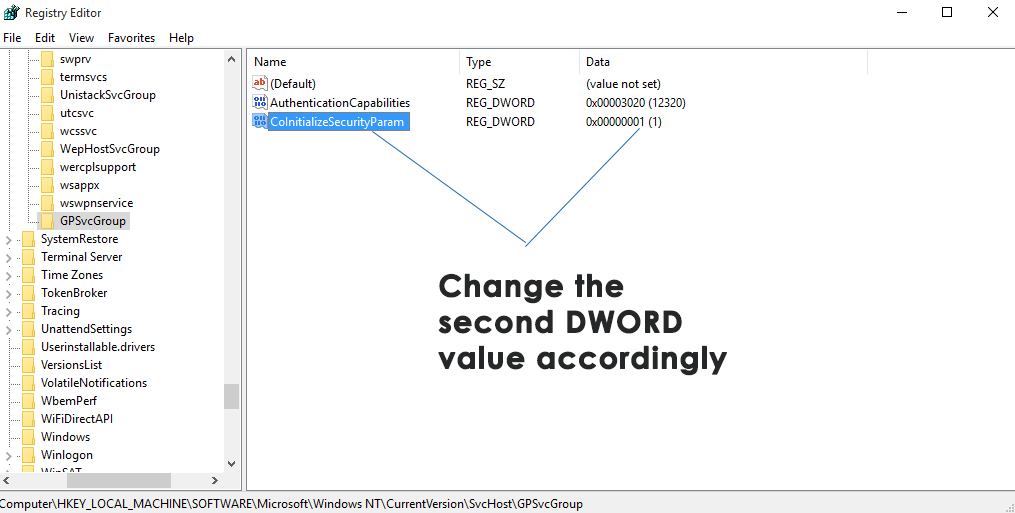
- Rename the second value to CoInitializeSecurityParam with a Value data of 1 and using Decimal as its base.
- Close the Registry Editor and restart the computer to see if the problem persists.
2. Performing a Clean Boot
This efficient environment can eliminate software conflicts that occur when multiple applications and services run simultaneously on startup. By performing a Clean Boot, you filter out any unrelated applications that could be interfering with the Group Policy Client service, potentially resolving the error.
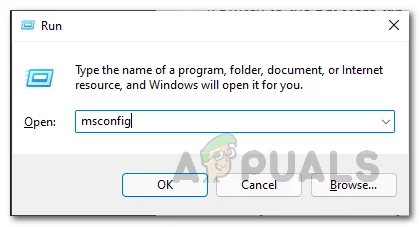
- Press the Windows Logo key + R, type msconfig, and click OK.
- Open the Services tab, check the Hide all Microsoft services option, then click Disable all.

- Switch to the Startup tab and click on Open Task Manager, under the Startup tab and disable each application by right-clicking and selecting Disable. You can re-enable necessary applications later in the same way.

- Restart your PC to check if the issue remains upon booting.
3. Reset the Winsock Catalog
By resetting the Winsock Catalog, you basically restore the network settings to their default state, which can often clear any configurations that may be interrupting the Group Policy Client’s ability to connect to the service properly. It’s a quick and often effective fix that aims for the underlying networking components for smooth communication within the system.
- Open the Start Menu.
- Search for cmd.
- Right-click on the search result titled cmd and choose Run as Administrator to open an elevated Command Prompt.
- Type the following into the elevated Command Prompt and press Enter:
netsh winsock reset
- Once the command is executed, close the elevated Command Prompt.
- Restart the computer and check if resetting the Winsock catalog has resolved the issue.
4. Allow Full Control of All Relevant Registry Keys
Taking control of registry keys is similar to securing the master keys of a software system. By obtaining full access permissions for the applicable registry keys, you effectively hold the authority to adjust configurations and correct any underlying issues that might be preventing the Group Policy Client service from connecting properly.
This step can potentially resolve the error by making sure that any necessary changes aren’t blocked by restricted permissions, contributing to smooth operation and effective communication between services.
- Press the Windows Logo key + R, type regedit, and press Enter to open the Registry Editor.
- In the Registry Editor, navigate to the following directory:
HKEY_LOCAL_MACHINE > SYSTEM > CurrentControlSet > services
- Right-click on the gpsvc sub-key under Services, and select Permissions… from the context menu.
- Click on Advanced.
- Navigate to the Owner tab.
- Select Administrators, check the Replace owner on subcontainers and objects option, click Apply, then OK.
- Repeat steps 4-5.
- Select Administrators, then click Edit…
- Check the Allow box for Full Control, then click OK.
- Check the box for Replace all child object permission entries with inheritable permission entries from this object.
- Click Apply and then OK.
- Now, in Permissions for gpsvc, click Apply and then OK.
- Retrieve the default gpsvc registry key for your Windows version from the following links:
Windows Vista
Windows 7
Windows 8/8.1
- Return to the Registry Editor, select File > Import.
- In the Import Registry File dialog, locate the downloaded registry file, select it, and click Open.
- If asked, confirm the import or merging of the registry file with the computer’s registry.
- After successful import and merging, restart the computer and verify if the error has been fixed upon startup.
5. Turn off Fast Startup (For Windows 10 Only)
Fast startup can sometimes interfere with system services and cause errors, such as the one with the Group Policy Client service. By disabling Fast Startup, the system undergoes a more complete shutdown process, potentially resolving service-related issues that occur during the boot sequence. This step makes sure that all services start from scratch, thus potentially eliminating errors caused by incomplete or corrupted initializations.
Method 1
- Right-click on the Start Menu button and open the WinX Menu.
- Select Power Options.
- Click on Choose what the power buttons do in the right pane.
- Click on Change settings that are currently unavailable.
- Uncheck the Turn on Fast Startup (recommended) option.
- Click on Save Changes and restart your PC.
Method 2
If the first method does not work or if you want to disable Fast Startup and reclaim some disk space (the hiberfile uses space equal to your RAM), here’s an alternative route. Note that it will also disable the Hibernate feature:
- Right-click on the Start Menu button and open the WinX Menu.
- Open an elevated Command Prompt by selecting Command Prompt (Admin).
- Type the following command and press Enter:
powercfg -h off - Close the elevated Command Prompt and restart your computer.
6. Manually Create Registry Keys and Values
Manually creating registry keys and values ensures that all necessary registry entries for the Group Policy Client service are correctly configured. This service relies on specific registry keys to run properly; if these keys are missing or corrupted, the service may fail to start. This can restore the service’s functionality, allowing your system to once again support group policies effectively.
Note: Before making any registry changes, it’s important to back up the registry database. So it can be reverted to the previous functioning state in case of errors.
- Hold the Windows logo key, type regedit, and right-click on the result, choosing Run as administrator.

- Confirm running Regedit as an administrator by clicking Yes.
- Navigate to the following path in the Registry Editor:
HKEY_LOCAL_MACHINE\SOFTWARE\Microsoft\Windows NT\CurrentVersion\Svchost - Find the netsvcs value data on the right side and select it.
- Right-click on netsvcs and choose Modify.

- In the new window, notice that gpsvc is missing. Add it at the end of a value data line, pressing Enter afterward, as shown below.
- Click OK after entering the value.

- Now, right-click on Svchost, choose New, then select Key and name it netsvcs.

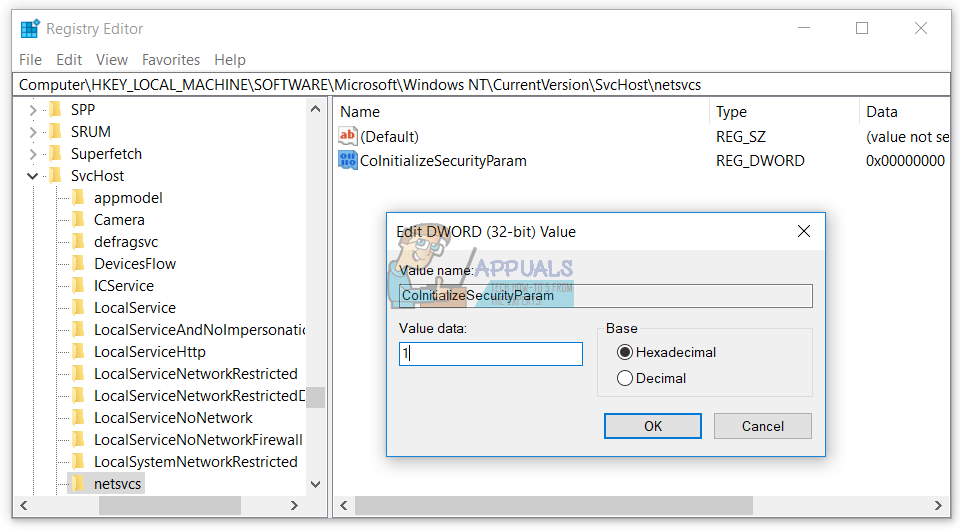
- Within the netsvcs key, right-click on the blank area, select New, then choose DWORD (32-bit) Value, even if your operating system is 64-bit.
- Create a DWORD value named CoInitializeSecurityParam and set its value to 1.
- In the same way, create another DWORD named CoInitializeSecurityAllowLowBox and set its value to 1.
- Continue and create a third DWORD called AuthenticationCapabilities and set its value to 3020.

- Restart your computer.
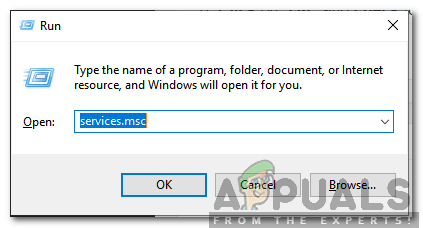
- Once restarted, press the Windows logo key + R.
- Type services.msc and hit Enter.
- Find the Group Policy Client service and confirm it’s running. If it is, your issue should now be resolved.
7. Start the System Event Notification Service
This service manages event notifications for system events, covering various components crucial to group policies. If accidental changes or updates turn this service off, restoring it to Automatic and activating it could repair communication pathways, making sure that group policy-related services and tasks operate smoothly once more.
- Simultaneously press Windows + R keys to open the Run prompt.
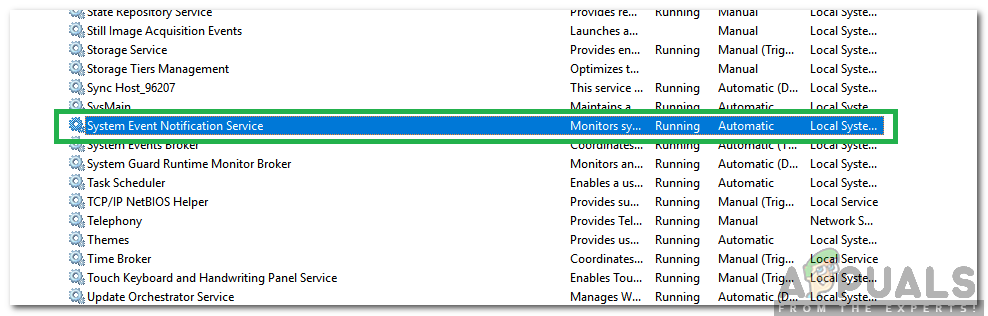
- Type services.msc and hit Enter.
Typing in services.msc and pressing Enter - Locate and double-click on the System Event Notification Service.
Double-clicking on the System Event Notification Service - Set the Startup Type to Automatic.
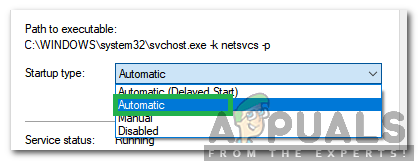
Selecting Automatic - Click the Start button, then hit Apply.
- Click OK and verify that the error no longer occurs.